System Notifications Management
Highlight on creating and managing in-app broadcast notices that appear under the student's bell icon.
Notifications are a powerful broadcast tool used to send internal notices to your student base. It is important to note that these are In-App Notifications that appear under the Bell Icon on the student's dashboard.
[!IMPORTANT] These are not external push notifications (like FCM/Mobile Push) or Email notifications. They are strictly internal broadcast messages that students see when they are logged into the Practet portal.
1. Understanding the Notification Bell
The notification center is the bell icon located in the top navigation bar of the student portal. When a student receives a new notification:
- A badge/dot appears on the bell icon.
- Clicking the icon reveals a list of recent broadcast messages.
- These notices are ideal for "Notice Board" style announcements.
- New practice test releases.
- Schedule changes or maintenance windows.
- General portal announcements.
- Success messages for enrollment.
2. Accessing the Notifications Dashboard
To manage your portal's communication:
- Log in to the Admin Portal.
- Locate the Communication section in the left-hand sidebar.
- Click on Notifications.
Here you will see a master list of all notifications sent to date, along with their creation timestamps and target status.
3. Creating a New Notification (Step-by-Step)
Follow these detailed steps to broadcast a message:
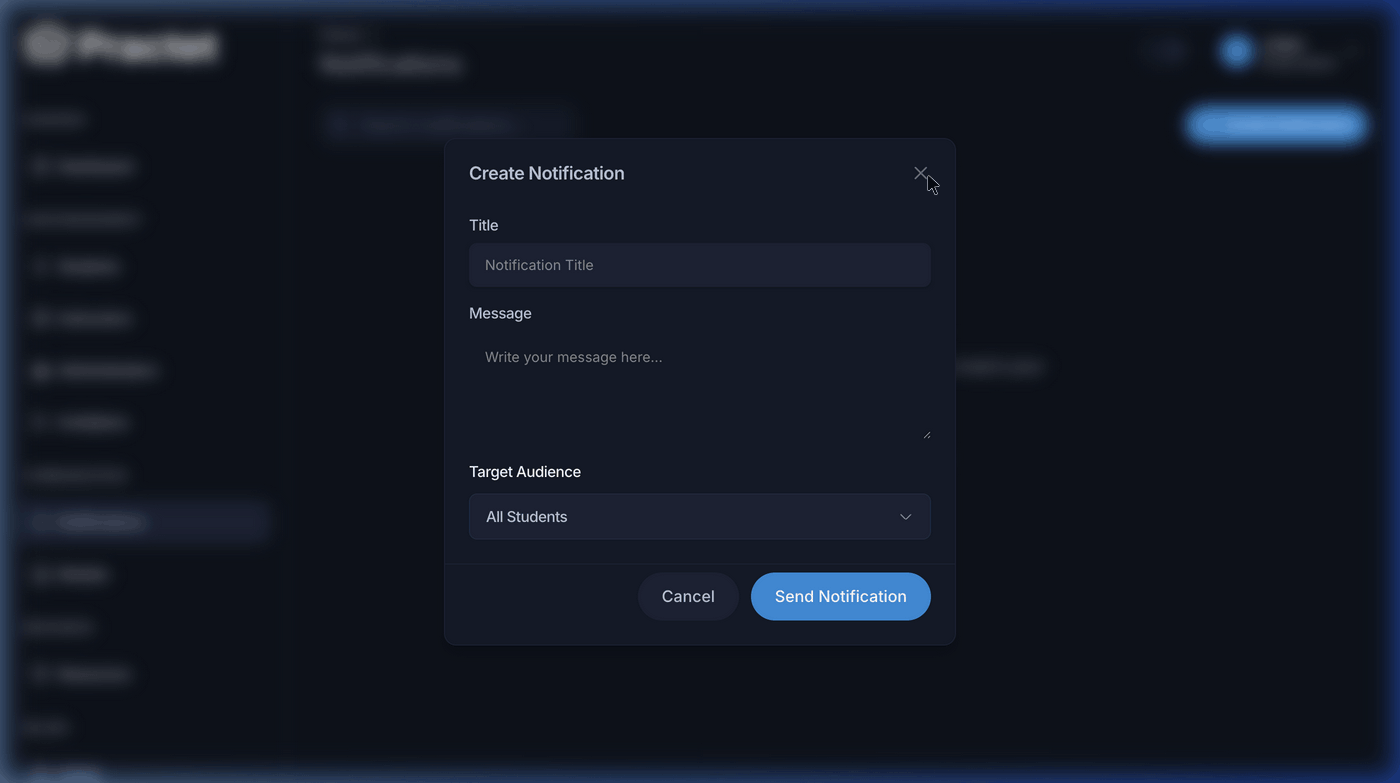
Step A: Launch the Creation Form
Click the Create Notification button in the top right corner of the dashboard. This will open the notification form modal.
Step B: Fill in the Details
- Title: This is the headline of your notification. Make it clear and actionable (e.g., "Action Required: Verify your email address" or "New: TOEFL Mock Test Pack is now Live!").
- Message: The main content of your announcement. Keep it concise but informative. You can include instructions or links to resources.
- Notification Type: (Optional) Some versions allow you to select a "Level" such as Info, Success, Warning, or Error. This changes the icon and color of the notification for the student.
Step C: Target Your Audience
You can decide who receives the message:
- Global: Send to every registered user on the portal.
- Specific Courses: Limit the notification only to students enrolled in specific courses (e.g., only IELTS students).
Step D: Send and Broadcast
Once you click Create, the notification is instantly dispatched to the target audience's portal accounts.
4. Best Practices for Admin Notifications
- Frequency: Do not overwhelm students with daily notifications. Reserve them for important or weekly updates.
- Clarity: Always use a clear "Call to Action" (CTA). If you want them to take a test, tell them exactly where to find it.
- Urgency: Use "Warning" levels only for critical issues like billing failures or upcoming portal downtime.
5. Managing Sent Notifications
While notifications are primarily "fire and forget," you can monitor the history from your dashboard.
- Status Tracking: See which notifications were recently added.
- History: Use the search bar to find old notifications to ensure you aren't repeating messages too often.
You might also find these helpful
Still need help?
Couldn't find what you were looking for? Our support team is ready to assist you with any questions.Contact us